Monday, April 16, 2012

Planning a Budget for Your Business Idea

With all of the research that I was doing I found out that I needed 4 types of things.

I needed:

  1. Safety Supplies
  2. Equipment
  3. Materials
  4. Storage

I created a list of everything the books told me that I needed.  Then I went and broke that list down to see what I already had and could use instead of what was on the list, or I could ask around for.  Then I made the list of what I needed, which by that time wasn’t as overwhelming as the first list I made, Whew.   

I didn’t need to make a lot of purchases right away, which was a relief.  I had to get the goggles, gloves and mask, there was no compromising on safety.  Since you cannot use your equipment again for cooking once you have used it with lye, I gave up my stick blender, my old crockpot and my candy thermometer, to the cause. 

For the materials  my husband and I checked out the local Wal-Mart to see what oils would be easily available to us, and I took note of them and created my recipes with them in soapcalc.  This gave me an idea of how much I would need.  I will go into this bit of planning in my next post on this subject.

The last thing that we needed to buy was storage to contain all of these items that were strictly for soap making. We bought these a week later after I realized what needed to be contained. If you buy everything the immediately you might not know exactly how you want to organize everything. I am glad I waited, because I was able to really know exactly where and how I wanted to store everything.

My husband and I discussed how much we could spend, we decided on a set amount per pay check.  This could be different for you, you might decide to have a set amount per month, or whatever.  A set amount during a specific amount of time is a sure fire way to not cut into your normal monthly budget and hurt yourself in the process. 

This is important, don’t charge your credit card or take out a loan for this.  It can be done a little at a time.  We started with only $40.00, it can be done.  Plus this makes you slow down and be very careful with the materials that you do use when you start out.  It makes your really respect your outcome more, because you can’t just go out and buy more if you mess up (well you know you physically could, but not if you want to cut into your budget).

If you cannot be disciplined and respect a budget then how do you really think you will be able to manage a business and all of the financial attributes that go along with it?  This is a key lesson here.  Do not put yourself in debt for something that you aren’t even sure you will like doing or are sure you can make into a sustainable income.  It is going to take time, it won’t happen over night, plus you don’t want it to happen overnight, you need to learn as you go.

I hope that you are able plan a budget to fulfill your dreams.  With a bit of planning a small amount can really add up to a big difference in you life.  Good luck on your path, I hope everything turns out wonderful for you.

Wednesday, April 11, 2012

My Handmade Soap


                             Full Bars that I made

I would like to share with you a few pictures of my first soaps.  I have given most of them away now but I will be making more soon.  I cannot wait to keep going, I am having so much fun making them and using them as well.  I have found that I love the recipes that I started out with, but the colorant and fragrance weren’t always spot on.  But I was able to rebatch those that I didn’t care for too much and they have turned out beautifully.  This set is my last one, I loved it so much I new it would be a great one for my testers!!! 

             GEDC1737      

These are my Orange-Bergamot Bastille Soaps that I made by Hot Process.  This set is my last one, I loved it so much I new it would be a great one for my testers!!!


       Lavendar Lard Soap

These are my Lavender Lard Soaps that I made by Cold Process, but the color didn’t stay and the fragrance was very weak.

       GEDC1746

So I Re-batched them and made a beautiful soap with Aloe, Oatmeal and Honey Additives.  I loved how these turned out.

       GEDC1740

These are my Apple Pie Shortening Soap, that I Cold Process Oven Processed.  They turned out beautiful.  They have Oatmeal and Honey and Lather so wonderfully.

        GEDC1743

This is my Carrot Peppermint Soap.  I made these with Carrot Juice, Oatmeal, Honey, and Peppermint Essential Oil.  The Lather is gorgeous and it feels great with refreshing peppermint coolness.  I love this recipe because it benefits the skin so nicely.  I only have this bar left!  I couldn’t keep these to myself. 

I hope everyone that got a chance to try these enjoys them as much as we do.  I can’t wait to get started on more.  Next time my focus will be on the style, now that I figured out which recipes work great for me.

Monday, April 9, 2012

My Promotional Idea

I love projects that I can do with the kids.  So a Melt and Pour kit was a great inexpensive taste of what playing with soap making would be.  The kids had a blast and I did too.  I didn’t really think much more about it other than it was a super easy craft to do with the kids.  When my father in law, complimented me and told me how awesome he thought the soap was and that I should start making them to sell, I started to pay attention. 
I wasn’t all that excited on my own because the project was too easy for me.  I know from watching many Soap Queen episodes on YouTube that the creativity is endless, but I wanted full control over the whole process.  Bringing lye into the house was something that my husband would have to agree with me on, it is a poisonous substance and we have small children.  I never considered it an option because I was afraid to ask if I could.  But when his father was encouraging me, my husband was on board already.
I had already touched on the subject about a year and a half ago when I found the Soap Queens series on YouTube.  I subscribed to a few other Vlogs and watched how they made their soaps, I was completely fascinated.  It was always one of those “someday, when I …” type things. 
Well this came at me kind of fast, and its been a whirl wind for me.  I have subscribed to about 6 more Vlogs on YouTube, I have read two great books cover to cover and I have been researching and taking notes as if I were in school.  This has taken me almost 2 months, I want to learn as much as I can before I spend a bunch of money that we just don’t have on quite possibly just a hobby.
Here are the questions I asked myself before spending anything other than my own time on my inspiration.
  1. What inspires me?
  2. What is holding me back from attempting it?
  3. Do I have a support system or will I have to fight to get support?
  4. Am I willing to do a lot of research on the subject, before I spend money on it?
  5. Am I willing to consider other peoples opinions on some of the choices I need to make?  If No, how important is it to me to have peace in our family? 
I would hate to see anyone put a lot of money into something that they just cannot pursue at this time, because of lack of time, a unified support system wasn’t in place, or the research wasn’t done and they dove in to something without being comfortable with the complete process.  There is an economic crisis right now and being very careful with what we spend it critical, I totally get that we too are living on a very tight budget.
I just want you to make a very educated decision before jumping in.  In my next post I will touch on how I budgeted and created a game plan for how to get started.  Good Luck and have fun, but do it smart so you can avoid the pitfalls.

Sunday, April 8, 2012

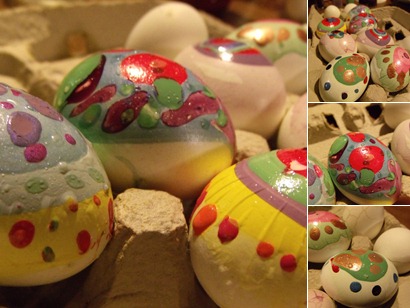
Easter Egg Decorating, a Unique Way...

We decorate Easter eggs every year, but this year I think they came out the best.  We tried a different method using nail polish, and it turned out amazing.  Check it out!
Believe it or not this is was actually so simple!
  1.   We started with a bowl of water, nail polishes and hmmm… well that was it!GEDC1699
  2. You take the nail polish and drip it onto the surface of the water.  Keep adding color until you get the desired effect that you like.GEDC1700
  3. Take your egg and dunk it onto the floating nail polish and it will wrap around your egg as you push the egg deeper into the water.  GEDC1701
  4. Pull the egg out and allow to dry.GEDC1702
We loved this technique even though it was very messy and a bit stinky.  It was fun to try something new, and the results are beautiful. 
I hope everyone has a safe and happy holiday!  Take care!

Easter Egg Soap

Here at Alice’s Niche we had a little fun with the kids yesterday.  We made wonderful Easter Eggs Melt and Pour Soaps for the family.  I think it came out wonderful!
For our soap making I envisioned striped Easter egg soaps, it was a longer process than I really bargained for, and I have yet to master the pretty aspect of soaping.  But we did fine for newbies. 
1.  I started by making a soap mold using a box that I filled in the center seem with to allow for a flattened bottom.  I then taped it together and cut down the side of the box to make a tray.
GEDC1626
2.  I then wrapped the box with freezer paper to allow for a leak proof seal.
  GEDC1622
3.  Then I got my colorant out and chose which ones I would use.   I use this ELF pallet only for coloring crafts. 
GEDC1632
4.  Using a tooth pick I took a bit of the eye shadow out and ground them up with my mortar and pestles(for this project I chose 3 colors, pink, orange and a bluish green).  I wrapped them in plastic wrap so I wouldn’t lose most of the color onto their rough surfaces.
 GEDC1636
I just love using the eye shadows for colorant, because you can mix your own colors so easily if you cannot find the one you like.  Here I chose to add a bit more yellow to the somewhat orange color I already had.
GEDC1643
5.  I then cut my white Melt and Pour into chunks and placed them into a heat safe container. 
  GEDC1646
6.  I then melted it in the microwave for about 50 seconds (depending on your microwave this might be different for you).
  GEDC1650
6.  I then mixed in one of the colors and poured it into the mold.  After the soap had hardened I popped it out and repeated with the next color until I had all 3 colors made into flat soap sheets.  I then began to cut sheet using a cookie cutter that was in the shape of and Easter egg.  I then bagged up the scraps of leftover soap to use in a project at a later time.
GEDC1651
7.  I repeated this until all 3 colors were cut into egg shapes and the scraps were all picked up.  I then stacked the egg shapes into pile of 1 orange, 1 bluish green, and 1 pink.
GEDC1667
8.  I then cut the stack into 3 equal parts, creating the “stripes” that I was envisioning. 
GEDC1671
9.  I then chunked up a very small amount of clear melt and pour soap and place in a heat safe container.
GEDC1672
10.  I then melted the soap in the microwave for about 40 seconds, and added fragrance to it.
  GEDC1674
11.  I then poured the melted clear melt and pour into the cookie cutter about 1/3 of the way up, while holding it on a sheet of freezer paper. 
GEDC1676
12.  After the soap had set up I was able to add 3 of the chunks of soap that were of different colors into the the cookie cutter to create the striped egg, then I pour clear melt and pour to fill the cookie cutter to the top. 
GEDC1679
13.  In order to make this process a bit faster I began doing the same process but in a soap mold instead.  (Whew!  I didn’t think I could hold onto that cookie cutter forever!)
GEDC1680
14.  And here is the final results. 
GEDC1682